- Malayan Campaign
-
Malayan Campaign Part of Pacific War, World War II 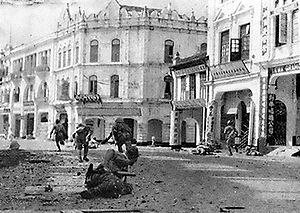
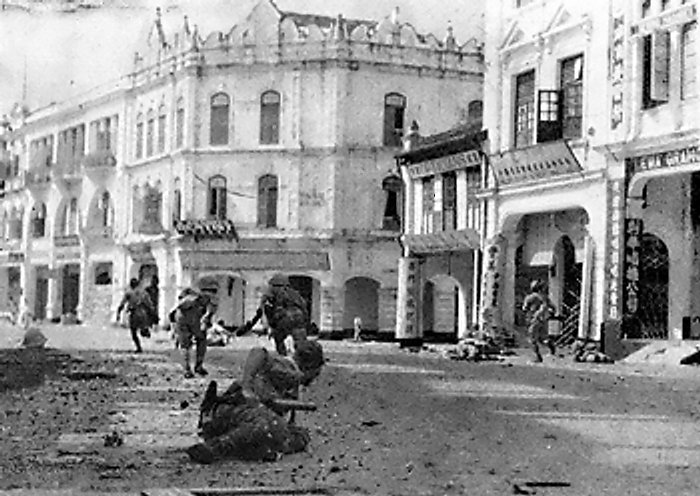
Japanese troops advancing through Kuala Lumpur.Date 8 December 1941 – 31 January 1942 Location British Malaya Result Japanese victory - Commonwealth army retreat to Singapore
- Japanese occupation of Malaya
- Emergence of the Malayan Peoples' Anti-Japanese Army
Belligerents Malaya Command:
 Indian III Corps
 8th Division
 Malay Regiment
 53rd Infantry Brigade
and various Commonwealth air forces[1]Twenty-Fifth Army:
 Imperial Guards
5th Division
18th Division
3rd Air Division
 22nd Air Flotilla
Commanders and leaders Arthur Percival[2]
Lewis Heath
Henry Gordon Bennett
Merton Beckwith-SmithTomoyuki Yamashita
Takuma Nishimura
Takuro Matsui
Renya MutaguchiStrength 140,000 men[1]
158 aircraft70,000 men
568 aircraft
200 tanksCasualties and losses 60,500
5,500 killed
5,000 wounded
40,000 captured[3]5,171
1,793 killed
3,378 wounded[4]French Indochina – Nauru - Thailand – Malaya – Hawaii - America - Hong Kong – Philippines – Guam – Wake – Marshalls & Gilberts - Dutch East Indies – New Guinea – Singapore – Australia – Indian Ocean – Doolittle Raid – Solomons - Coral SeaFrench Indochina 1940 – Franco-Thai War – Thailand – Malaya – Dutch East Indies – 1st Burma Campaign – Singapore – Indian Ocean 1940–45 – 2nd Burma Campaign – Air Raids 1944–45 – 3rd Burma Campaign – 4th Burma Campaign – French Indochina 1945 – Malacca Strait – TideraceMalayan CampaignKota Bharu – Singapore – Krohcol – Prince of Wales & Repulse – Jitra – Kampar – Slim River – Gemas – Muar – EndauThe Malayan Campaign was a campaign fought by Allied and Japanese forces in Malaya, from 8 December 1941 – 31 January 1942 during the Second World War. The campaign was dominated by land battles between British Commonwealth army units, and the Imperial Japanese Army. For the British, Indian, Australian and Malayan forces defending the colony, the campaign was a total disaster.
The battle is notable for the Japanese use of bicycle infantry, which allowed troops to carry more equipment and swiftly move through thick jungle terrain. Royal Engineers, equipped with demolition charges, destroyed over a hundred bridges during the retreat, which did little to delay the Japanese. By the time the Japanese had captured Singapore, they had suffered 9,600 casualties.[5]
Contents
Background
Between the wars, Britain's military strategy in the Far East was undermined by a lack of attention and funding. The British government's plans relied primarily on the stationing of a strong fleet at the Singapore Naval Base in the event of any enemy hostility, both to defend Britain's Far Eastern possessions and the route to Australia. A strong naval presence was also thought to act as a deterrent against possible aggressors. By 1940, however, the army commander in Malaya, Lieutenant-General Lionel Bond conceded that a successful defence of Singapore demanded the defence of the whole peninsula, and that the naval base alone wouldn't be sufficient to deter a Japanese invasion.[6] The defence strategy rested on two basic assumptions: first, that there would be sufficient early warning of an attack to allow for reinforcement of British troops, and second that American help was at hand in case of the attack. By late 1941, it became clear that neither of these assumptions had any real substance.[6]
Once the Second World War commenced, Britain and the Middle East received higher priorities in the allocation of men and material. The desired Malayan air force strength of 300–500 aircraft was never reached. When the Japanese invaded, they had over 200 tanks, consisting of the Type 95 Ha-Go, Type 97 Chi-Ha, Type 89 I-Go and Type 97 Te-Ke.[7] Commonwealth troops were equipped with the Lanchester 6x4 Armoured Car, Marmon-Herrington Armoured Car, Universal Carrier and only a handful of Light Tank Mk VIs, of which none were sufficiently armed for armoured warfare.[8]
The British had plans for a pre-emptive invasion of southern Thailand, named Operation Matador, to forestall Japanese landings, but decided not to use them.
Japan invades
Main article: Japanese Invasion of MalayaThe Battle of Malaya began when the 25th Army invaded Malaya on 8 December 1941. Japanese troops launched an amphibious assault on the northern coast of Malaya at Kota Bharu and started advancing down the eastern coast of Malaya.[9] This was made in conjunction with landings at Pattani and Songkhla in Thailand, where they then proceeded south overland across the Thailand-Malayan border to attack the western portion of Malaya.
The Japanese were allied with the Axis collaborators, the Vichy French, and had been given access to naval facilities and supplies in French Indochina where they massed their forces for the invasion. They then coerced the Thai government into letting them use Thai military bases to launch attacks into Malaya, after having fought Thai troops for eight hours early in the morning. At 04:00, 17 Imperial Japanese Navy bombers attacked Singapore, the first ever air raid aimed at the colony. It became evident Japanese aircraft bombers operating in Saigon were now in range of Singapore.
The Japanese were initially resisted by III Corps of the Indian Army and several British Army battalions. The Japanese quickly isolated individual Indian units defending the coastline, before concentrating their forces to surround the defenders and force their surrender.
The Japanese forces held a slight advantage in numbers on the ground in northern Malaya, and were significantly superior in close air support, armour, co-ordination, tactics and experience, with the Japanese units having fought in China. The Allies had no tanks, which had put them at a severe disadvantage. The Japanese also used bicycle infantry and light tanks, which allowed swift movement of their forces overland through the terrain that was covered with thick tropical rainforest, albeit criss-crossed by native paths. Although the Japanese had not brought bicycles with them (in order to speed the disembarkation process), they knew from their intelligence that suitable machines were plentiful in Malaya and quickly confiscated what they needed from civilians and retailers.
A replacement for Operation Matador, named Operation Krohcol, was implemented on 8 December, but the Indian troops were easily defeated by the Japanese 5th Division, which had already landed in Pattani Province, Thailand.
The naval Force Z—consisting of the battleship HMS Prince of Wales, battlecruiser HMS Repulse, and four destroyers, under the command of Admiral Tom Phillips—had arrived right before the outbreak of hostilities. However, Japanese air superiority led to the sinking of the capital ships on 10 December, leaving the east coast of Malaya exposed and allowing the Japanese to continue their landings.
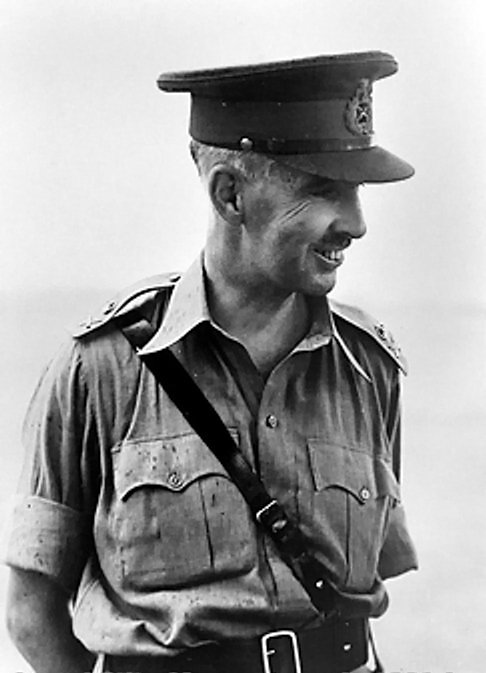
-
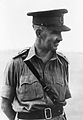
Lt Gen Arthur Percival GOC of Malaya at the time of the Japanese invasion
-

Lt Gen Tomoyuki Yamashita, Commander of the Japanese 25th Army.
-
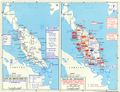
Map of the Malayan Campaign
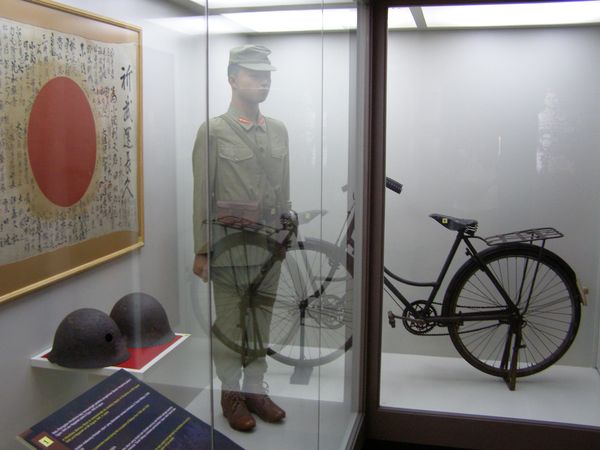
-

The Japanese bicycle
Air war
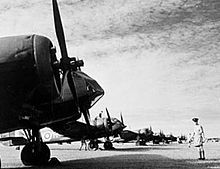
The Allied fighter squadrons in Malaya—equipped with Brewster Buffaloes—were beset with numerous problems, including: poorly-built and ill-equipped planes;[10][11] inadequate supplies of spare parts;[11] inadequate numbers of support staff;[12] airfields that were difficult to defend against air attack;[10] lack of a clear and coherent command structure;[10] antagonism between RAF and Royal Australian Air Force squadrons and personnel,[12] and; inexperienced pilots lacking appropriate training.[10]
Further adding to these problems was the Mitsubishi A6M Zero, which outclassed every Allied aircraft in Malaya. Because of this, allied air forces suffered severe losses in the first week of the campaign, resulting in the ongoing merger of squadrons and their gradual evacuation to the Dutch East Indies. One pilot—Sergeant Malcolm Neville Read of 453 Squadron RAAF—sacrificed himself by ramming his Buffalo into a Nakajima Ki-43 Oscar of 64th Sentai over Kuala Lumpur on 22 December.[13][14]
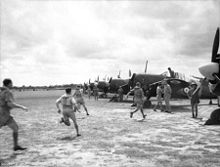 Pilots of No. 453 Squadron RAAF responding to a scramble order.
One squadron of the Royal Netherlands East Indies Army Air Force (ML-KNIL) — 2-VLG-V — was deployed to Singapore, contributing to the Allied cause before being recalled to Java on 18 January. Several Dutch pilots—including Jacob van Helsdingen and August Deibel—responded to a number of air raids over Singapore while stationed at Kallang Airport. They claimed a total of six aircraft, particularly the Nakajima Ki-27 Nate, which fared poorly in Malaya. Their involvement in Malaya, however, did little to weaken the Japanese air force.
The remaining offensive aircraft—the Bristol Blenheim, Lockheed Hudson light bombers and Vickers Vildebeest torpedo bombers—were obsolete. Most were quickly destroyed by Japanese aircraft and played an insignificant part in the campaign. One Blenheim pilot—Squadron Leader Arthur Scarf—was posthumously awarded the Victoria Cross for an attack on 9 December.
In addition, the Japanese military intelligence service had managed to recruit a British officer, Captain Patrick Heenan, an Air Liaison Officer with the Indian Army.[15] While the effects of Heenan's actions are disputed, the Japanese were able to destroy almost every Allied aircraft in northern Malaya within three days. Heenan was arrested on 10 December and sent to Singapore. However, the Japanese had already achieved air superiority.
Advance down the Malayan Peninsula
The defeat of Allied troops at Jitra by Japanese forces, supported by tanks moving south from Thailand on 11 December 1941 and the rapid advance of the Japanese inland from their Kota Bharu beachhead on the north-east coast of Malaya overwhelmed the northern defences. Without any real naval presence, the British were unable to challenge Japanese naval operations off the Malayan coast, operations which proved invaluable to the invading army. With virtually no remaining Allied planes, the Japanese also had mastery of the skies, leaving the Allied ground troops and civilian population exposed to air attack.
The Malayan island of Penang was bombed daily by the Japanese from 8 December and abandoned on 17 December. Arms, boats, supplies and a working radio station were left in haste to the Japanese. The evacuation of Europeans from Penang, with local inhabitants being left to the mercy of the Japanese, caused much embarrassment for the British and alienated them from the local population. Historians judge that "the moral collapse of British rule in Southeast Asia came not at Singapore, but at Penang" [16]
On 23 December, Major-General David Murray-Lyon of the Indian 11th Infantry Division was removed from command to little effect. By the end of the first week in January, the entire northern region of Malaya had been lost to the Japanese. At the same time, Thailand officially signed a Treaty of Friendship with Imperial Japan, which completed the formation of their loose military alliance. Thailand was then allowed by the Japanese to resume sovereignty over several sultanates in northern Malaya, thus consolidating their occupation. It did not take long for the Japanese army's next objective, the city of Kuala Lumpur, to fall. The Japanese entered and occupied the city unopposed on 11 January 1942. Singapore Island was now less than 200 mi (320 km) away for the invading Japanese army.
The 11th Indian Division managed to delay the Japanese advance at Kampar for a few days, in which the Japanese suffered severe casualties in terrain that did not allow them to use their tanks or their air superiority to defeat the British. The 11th Indian Division was forced to retreat when the Japanese landed troops by sea south of the Kampar position. The British retreated to prepared positions at Slim River.
At the disastrous Slim River battle, in which two Indian brigades were practically annihilated, the Japanese used surprise and tanks to devastating effect in a risky night attack. The success of this attack forced Percival into replacing the 11th Indian Division with the 8th Australian Division.
Defence of Johor
Main article: Battle of Muar
By mid-January, the Japanese had reached the southern Malayan state of Johore where, on 14 January, they encountered troops from the Australian 8th Division, commanded by Major-General Gordon Bennett, for the first time in the campaign. During engagements with the Australians, the Japanese experienced their first major tactical setback, due to the stubborn resistance put up by the Australians at Gemas. The battle—centred around the Gemensah Bridge—proved costly for the Japanese, who suffered up to 600 casualties but the bridge itself—which had been demolished during the fighting—was repaired within six hours.[17]
As the Japanese attempted to outflank the Australians to the west of Gemas, one of the bloodiest battles of the campaign began on 15 January on the peninsula's West coast near the Muar River. Bennett allocated the 45th Indian Brigade—a new and half-trained formation—to defend the river's South bank but the unit was outflanked by Japanese units landing from the sea and the Brigade was effectively destroyed with its commander, Brigadier H. C. Duncan, and all three of his battalion commanders killed.[17] Two Australian infantry battalions—which had been sent to support the 45th Brigade—were also outflanked and their retreat cut off, with one of the Australian battalion commanders killed in the fighting around the town of Bakri, south-east of Muar. During the fighting at Bakri Australian anti-tank gunners had destroyed nine Japanese tanks,[17] slowing the Japanese advance long enough for the surviving elements of the five battalions to attempt an escape from the Muar area.[17]
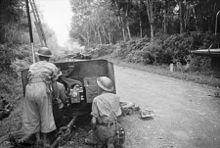 Australian anti-tank gunners firing on Japanese tanks at the Muar-Parit Sulong Road.
Led by Australian Lieutenant-Colonel Charles Anderson, the surviving Indian and Australian troops formed the "Muar Force" and fought a desperate four-day withdrawal,[17] allowing remnants of the Commonwealth troops withdrawing from northern Malaya to avoid being cut off and to push past the Japanese to safety. When the Muar Force reached the bridge at Parit Sulong and found it to be firmly in enemy hands, Anderson, with mounting numbers of dead and wounded, ordered "every man for himself". Those that could took to the jungles, swamps and rubber plantations in search of their division headquarters at Yong Peng. The wounded were left to the mercy of the Japanese and all but two out of 135 were tortured and killed in the Parit Sulong Massacre. Anderson was awarded a Victoria Cross for his fighting withdrawal.[17] The Battle of Muar cost the allies an estimated 3,000 casualties including one brigadier and four battalion commanders.[17]
On 20 January, further Japanese landings took place at Endau, in spite of an air attack by Vildebeest bombers. The final Commonwealth defensive line in Johore of Batu Pahat-Kluang-Mersing was now being attacked along its full length. Unfortunately, Percival had resisted the construction of fixed defences in Johore, as on the North shore of Singapore, dismissing them in the face of repeated requests to start construction from his Chief Engineer, Brigadier Ivan Simson, with the comment "Defences are bad for morale." On 27 January, Percival received permission from the commander of the American-British-Dutch-Australian Command—General Archibald Wavell—to order a retreat across the Johore Strait to the island of Singapore.
Retreat to Singapore
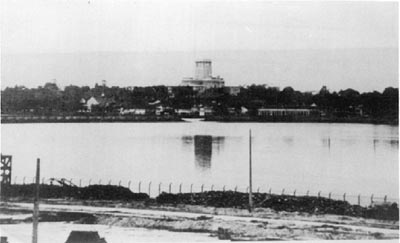
Main article: Battle of Singapore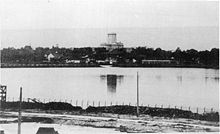 A view of the causeway, blown up after the Allied retreat, with the visible gap in the middle
On 31 January, the last organised Allied forces left Malaya, and Allied engineers blew a 70 ft (21 m)-wide hole in the causeway that linked Johore and Singapore; a few stragglers would wade across over the next few days. Japanese raiders and infiltrators, often disguised as Singaporean civilians, began to cross the Straits of Johor in inflatable boats soon afterwards.
In less than two months, the Battle for Malaya had ended in comprehensive defeat for the Commonwealth forces and their retreat from the Malay Peninsula. Nearly 50,000 Commonwealth troops had been captured or killed during the battle. The Japanese Army invaded the island of Singapore on 7 February and completed their conquest of the island on 15 February.
By the end of January, Patrick Heenan—British Indian Army captain convicted of treason, after spying for Japan—had been court-martialled and sentenced to death.[15] On 13 February, five days after the invasion of Singapore Island, and with Japanese forces approaching the city centre, Heenan was taken by military police to the waterside and was hastily executed. His body was thrown into the sea.
All of the remaining troops in Malaya retreated into Singapore and when the last trooper set foot across the bridge, the island of Singapore was isolated; engineers destroyed the last remaining bridge.
Battles of the campaign
- Battle of Kota Bharu (1941)
- Bombing of Singapore (1941)
- Operation Krohcol (1941)
- Sinking of Prince of Wales and Repulse (1941)
- Battle of Jitra (1941)
- Battle of Kampar (1941)
- Battle of Slim River (1942)
- Battle of Gemas (1942)
- Battle of Muar (1942)
- Battle off Endau (1942)
See also
- Japanese invasion of Thailand
- Japanese order of battle during the Malayan Campaign
- Malaya Command-Order of Battle
Footnotes
- ^ a b Frank Owen (2001). The Fall of Singapore. England: Penguin Books. ISBN 0-14-139133-2.
- ^ L, Klemen (1999-2000). "Lieutenant-General Arthur Ernest Percival". Forgotten Campaign: The Dutch East Indies Campaign 1941-1942. http://www.dutcheastindies.webs.com/percival.html.
- ^ Altogether Allied forces lost 7,500 killed, 10,000 wounded and about 120,000 captured for the entire Malayan Campaign
- ^ Smith, Colin (2006). Singapore Burning. Penguin Books. p. 547. ISBN 0-141-01036-3.
- ^ Generals At War. Nicholas Rowe, Alistair Irwin. National Geographic Channel, Singapore. 21 September 2009. 60 minutes in.
- ^ a b Bayly/Harper, p. 107
- ^ Bayly/Harper, p. 110
- ^ Klemen, L. "100th Indian Indp. Light Tank Squadron, Malaya 1942". The Netherlands East Indies 1941–1942. http://www.dutcheastindies.webs.com/indian_tank.html.
- ^ L, Klemen (1999-2000). ""Seventy minutes before Pearl Harbor" The landing at Kota Bharu, Malaya, on December 7th 1941". Forgotten Campaign: The Dutch East Indies Campaign 1941-1942. http://www.dutcheastindies.webs.com/kota_bharu.html.
- ^ a b c d Squadron Leader W.J. Harper, 1946, "REPORT ON NO. 21 AND NO. 453 RAAF SQUADRONS" (UK Air Ministry), p.1 (Source: UK Public Records Office, ref. AIR 20/5578; transcribed by Dan Ford for Warbird's Forum.) Access date: 8 September 2007
- ^ a b Harper report, p.2
- ^ a b Harper report, p.1-2
- ^ Notable Brewster Buffalo pilots in Southeast Asia, 1941–42, http://www.warbirdforum.com/notable.htm
- ^ Aeroprints, Jon Field, http://www.aeroprints.co.uk/gallery.htm, retrieved 2010-11-23
- ^ a b Peter Elphick, 2001, "Cover-ups and the Singapore Traitor Affair" Access date: 5 March 2007.
- ^ Bayly/Harper, p. 119
- ^ a b c d e f g Wigmore, Lionel (1957). "AWM Military Histories". Australian War Memorial. http://www.awm.gov.au/cms_images/histories/20/chapters/12.pdf. Retrieved 17 April 2009.
References/further information
- Bayly, Christopher / Harper, Tim: Forgotten Armies. Britain's Asian Empire and the War with Japan. Penguin Books, London, 2005
- Bose, Romen, "SECRETS OF THE BATTLEBOX:The Role and history of Britain's Command HQ during the Malayan Campaign", MArshall Cavendish, Singapore, 2005
- Burton, John (2006). Fortnight of Infamy: The Collapse of Allied Airpower West of Pearl Harbor. US Naval Institute Press. ISBN 159114096X.
- Cull, Brian (2004). Hurricanes Over Singapore: RAF, RNZAF and NEI Fighters in Action Against the Japanese Over the Island and the Netherlands East Indies, 1942. Grub Street Publishing. ISBN 978-1904010807.
- Cull, Brian (2008). Buffaloes over Singapore: RAF, RAAF, RNZAF and Dutch Brewster Fighters in Action Over Malaya and the East Indies 1941–1942. Grub Street Publishing. ISBN 978-1904010326.
- Dixon, Norman F, On the Psychology of Military Incompetence, London, 1976
- Falk, Stanley L. (1975). Seventy days to Singapore: The Malayan Campaign, 1941–1942. Hale. ISBN 070914928X.
- Kelly, Terence (2008). Hurricanes Versus Zeros: Air Battles over Singapore, Sumatra and Java. Pen and Sword. ISBN 978-1844156221.
- L, Klemen (1999-2000). "Forgotten Campaign: The Dutch East Indies Campaign 1941-1942". http://www.dutcheastindies.webs.com/index.html.
- Seki, Eiji. (2006). Mrs. Ferguson's Tea-Set, Japan and the Second World War: The Global Consequences Following Germany's Sinking of the SS Automedon in 1940. London: Global Oriental. 10-ISBN 1-905-24628-5; 13- ISBN 978-1-905-24628-1 (cloth) [reprinted by University of Hawaii Press, Honolulu, 2007 – previously announced as Sinking of the SS Automedon and the Role of the Japanese Navy: A New Interpretation.]
- Shores, Christopher F; Cull, Brian; Izawa, Yasuho. Bloody Shambles, The First Comprehensive Account of the Air Operations over South-East Asia December 1941 – April 1942 Volume One: Drift to War to the Fall of Singapore. London: Grub Street Press. (1992) ISBN 094881750X
- Smyth, John George Smyth, Percival and the Tragedy of Singapore, MacDonald and Company, 1971
- Thompson, Peter, The Battle for Singapore, London, 2005, ISBN 0-7499-5068-4 (HB)
External links
- Campaign in Malaya on The Children (& Families) of the Far East Prisoners of War
- Royal Engineers Museum Royal Engineers and the Second World War – the Far East
- Australia's War 1939–1945: Battle of Malaya
- Animated History of the Fall of Malaya and Singapore
Categories:- 1941 in Malaya
- 1942 in Malaya
- Battles of World War II involving Australia
- Conflicts in 1941
- Conflicts in 1942
- Military history of Malaysia
- Military history of Malaya during World War II
- Military history of India during World War II
- World War II operations and battles of the Southeast Asia Theatre


Wikimedia Foundation. 2010.